
Moving to Spain in the middle of summer can be a shock! My family and I quickly learned this as we settled in, facing one heat wave after another. While our phones could tell us the temperature for our town, I was more interested in the specific conditions right inside our apartment. How hot was it in the living room? What about the kitchen after cooking a meal?
Instead of buying a pre-made smart home device, I decided to turn this into a fun, educational project for my older son. I wanted to show him how we could build something useful from scratch.
Our First Attempt
I initially planned to use an Arduino Uno with a breadboard, a 4-digit display, and an LED bar indicator to show the temperature and humidity. It was a great way to test the sensors and code, but I quickly realized we could make it a much more modern and practical device.
So, we switched gears! I swapped the Arduino Uno for a Wemos D1 Mini, a small board with built-in Wi-Fi. I also replaced the physical displays with a simple HTTP response, which is a more flexible way to get data. This allows the device to send data to any connected system, like a smartphone or a smart home hub.
The Hardware You’ll Need
Here’s the simple list of components we used:
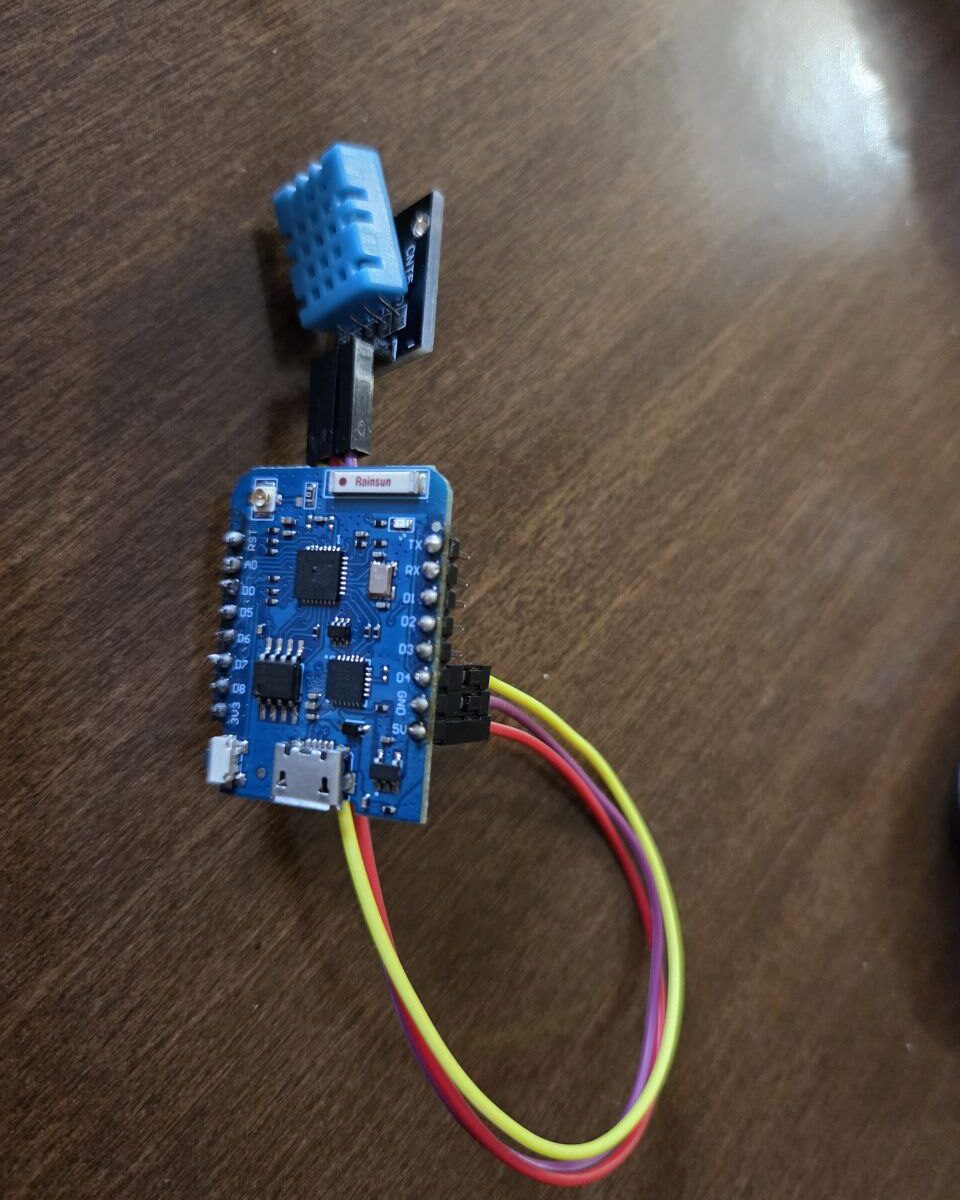
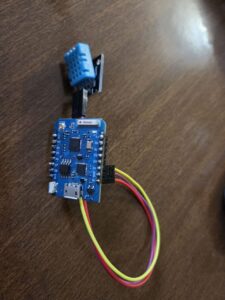
- 1 x Wemos D1 Mini: Our main controller with built-in Wi-Fi.
- 1 x DHT11 Sensor: This tiny, affordable sensor measures both humidity and temperature.
- Connecting cables: To wire the sensor to the Wemos D1 Mini.
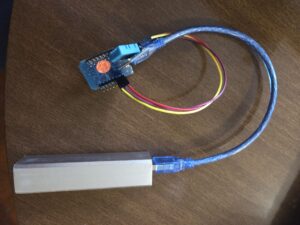
- 1 x USB to Micro USB cable: For powering and programming the Wemos.
- 1 x Power Bank: A portable power source that lets you move the sensor anywhere.
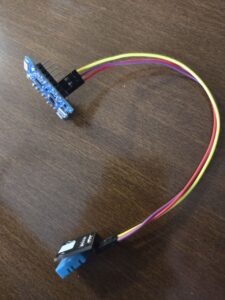
Wiring the DHT11 sensor to the Wemos D1 Mini is straightforward—you’ll need to connect the 5V, Ground, and data pins. You can find plenty of diagrams online, but here is a simple one to get you started:
Making it Smart
The real magic happens in the code. Our firmware is designed to do just one thing: when a specific web address is requested, it reads the humidity and temperature data from the sensor and sends it back as a JSON object. This format is perfect for smart home software like Home Assistant, which can easily read and parse the data.
#include <ESP8266WiFi.h>

const char* ssid = "2.4 GHZ Wifi SSID";
const char* password = "WIFI PASS";

WiFiServer server(80);

#include <DHT11.h>
DHT11 dht11(2);

void setup() {
Serial.begin(115200);
delay(10);

// Connect to WiFi network
Serial.println();
Serial.println();
Serial.print("Connecting to ");
Serial.println(ssid);

WiFi.begin(ssid, password);

while (WiFi.status() != WL_CONNECTED) {
delay(500);
Serial.print(".");
}

Serial.print("Wifi Status: ");
Serial.println(WiFi.status());

Serial.println("");
Serial.println("WiFi connected");

// Start the server
server.begin();
Serial.println("Server started");

// Print the IP address
Serial.print("Use this URL : ");
Serial.print("http://");
Serial.print(WiFi.localIP());
Serial.println("/");
}

void loop() {
//
// Serial.print("Wifi Status: ");
// Serial.println(WiFi.status());

int temperature = 0;
int humidity = 0;

while (WiFi.status() != WL_CONNECTED) {
delay(500);
Serial.print(".");
}

// Check if a client has connected
WiFiClient client = server.available();

if (!client) {
return;
}

// Wait until the client sends some data
Serial.println("new client");

while(!client.available()){
delay(1);
}

// Read the first line of the request
String request = client.readStringUntil('\r');
Serial.println(request);
client.flush();

// Match the request

if (request.indexOf("/READ=ON") != -1) {
for (int x = 0; x < 5; x++){
dht11.readTemperatureHumidity(temperature, humidity);
delay(500);
Serial.print("Sensor Loop: ");
Serial.println(x);

if (humidity > 0){
// Return the response
client.println("HTTP/1.1 200 OK");
client.println("Content-Type: application/json");
client.println(""); // do not forget this one
client.print("{ \"temperature\": ");
client.print(temperature);
client.print(", \"Humidity\": ");
client.print(humidity);
client.print(" ,\"temperature_symbol\": \"°C\", \"humidity_symbol\": \"%\"");
client.print(", \"sensor_attempts\": ");
client.print(x+1);
client.print("}");
break;
}

if(x == 4 ){
Serial.println("Limit attemps reached (5)!");
client.println("HTTP/1.1 200 OK");
client.println("Content-Type: application/json");
client.println(""); // do not forget this one
client.print("{ \"error\": \"Sensor readings failed after 5 attempts!\"");
client.print("}");
}

}

Serial.print("Humidity: ");
Serial.print(humidity, 1);
Serial.print("%");
Serial.print(" | ");
Serial.print("Temperatura: ");
Serial.print(temperature, 1);
Serial.println("C");
}


// Return the response
// client.println("HTTP/1.1 200 OK");
// client.println("Content-Type: application/json");
// client.println(""); // do not forget this one
// client.println("<!DOCTYPE HTML>");
// client.println("<html>");
// client.println("Temperature: ");
// client.println(temperature);
// client.println(" C <br>");
// client.println("Humidity: ");
// client.println(humidity);
// client.println("% <br>");
// client.println("</html>");
// client.print("{ \"temperature\": ");
// client.print(temperature);
// client.print(", \"Humidity\": ");
// client.print(humidity);
// client.print(" ,\"temperature_symbol\": \"°C\", \"humidity_symbol\": \"%\"");
// client.print("}");

Serial.println("Client disconnected");
Serial.println("");
}
{ "temperature": 29, "Humidity": 42 ,"temperature_symbol": "°C", "humidity_symbol": "%", "sensor_attempts": 1}
My next steps are to add more sensors, 3D print a custom case for the project, and connect it directly to a wall outlet. While the power bank is great for portability, a direct power source is much more convenient for a permanent installation.
This project was a fantastic way to introduce my son to electronics and coding, and it’s given us a great tool to understand the climate inside our new home.
What DIY projects have you done to make your home smarter? I’d love to hear about them!